


November 7th, 2007 by Stinkhead

I recently stumbled across an article highlighting odd looking USB thumb drive devices found on the web. After having recently attended a conference where USB thumb drives were in short supply, I decided to make my own distinct try. I picked the playmobil Astronaut special for a few reasons. First off, he’s cool looking. Secondly, he’s available now online and at independant toy stores. (The Target version has a tinted face shield). Being widely available, he’s still available for $3 or less. And thirdly, his helmet snapping on and off would make a great cap for when I ram the drive in my pocket or laptop case.
;) This finished product at the right features moving arms and legs, and 256 Mb Sony Microvault (the larger capacity drives are the same physical size, so if you wanted to make one with a gig capacity, go ahead! Check em out). The first one I made however used a traditional looking USB drive, which was somewhat bulkier and required much more canoodling. I’ll take you through both. Basically, there’s no wiring, welding, or anything super complicated here. All you do is hollow out a playmobil figure and securely glue a USB drive within.
This finished product at the right features moving arms and legs, and 256 Mb Sony Microvault (the larger capacity drives are the same physical size, so if you wanted to make one with a gig capacity, go ahead! Check em out). The first one I made however used a traditional looking USB drive, which was somewhat bulkier and required much more canoodling. I’ll take you through both. Basically, there’s no wiring, welding, or anything super complicated here. All you do is hollow out a playmobil figure and securely glue a USB drive within.
 Attempt One
Staples had a 64Mb flash drive for $7. Since I’d have to use pliers and rip off the protective housing, I thought I’d start cheap incase this was a playmodisaster. Like that time I tried to custom build my own playmobil Towering Inferno. That smell still lingers.
 So with the drive in hand, and the new, willing, playmo-body, I went to work. I’ve never done “kit-bashing” like this in the past, so I had no idea what to do. The first step as I could see it, was dismantling the playmobil man. I removed all the accessories and hair. With a firm pop, I got his head off. At first it seems like it’s going to be really tough, but after awhile, I was popping heads off left and right. Some citizens of Mr. Stinkhead’s playmobil town will never be the same. After I got the head off, I popped off the legs. At this point, it was very easy to remove the white skeleton from the torso piece, which freed the arms. I now had an empty “rib cage” type piece.
 Using pliers and my drill on a very small bit, I started perforating the top of the torso with a series of holes, perfectly bisecting the neck hole, but not getting too close to the shoulders. Then I moved to a slightly larger drill bit and made the holes bigger. I repeated this with larger drill bits until I could easily “connect the dots” had have a nice skinny slot on top. (A dremel works too) This was all trial and error, and one or two klickies will not be attending the picnic this year, if you know what I’m saying. They weren’t invited, they talk too much, and one has BO really bad.
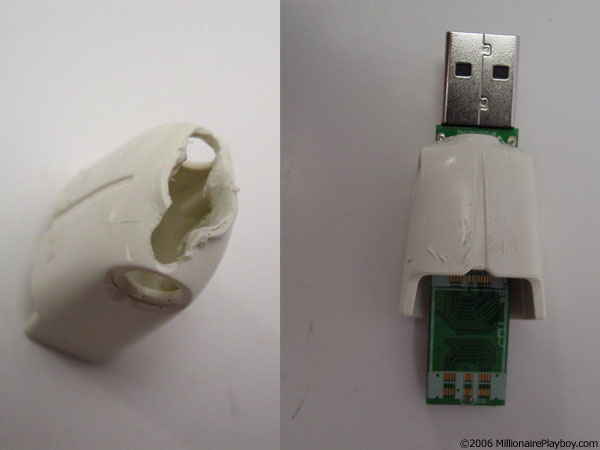
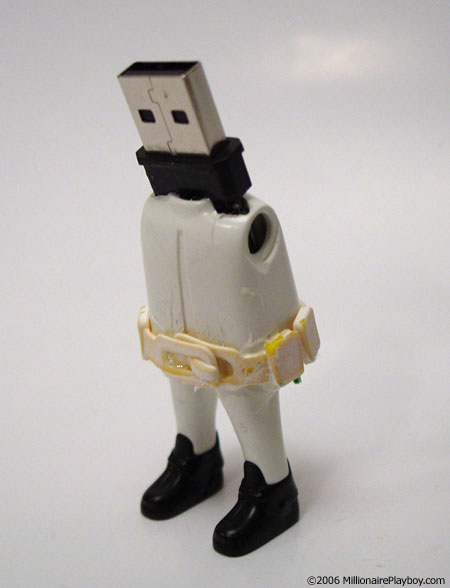 I started to carefully line up the little circuit board with the USB plug on one end so it would fit within the torso. Early one it became evident that even if I squeezed his arms back in there, his legs would not fit correctly, and his arms would not move. After I had the drive in the perfect spot, I used a liberal amount of adhesive to secure the “neck” of the USB drive within the shoulder slot I created. I used a waterproof plastic bond… the brand I used was specifically for bonding plastics and is supposed to be odorless and colorless. I tried really hard to not let any of the goo get on the circuit board, but I also tried really hard to not let the RA hear us in the shower. Whoops.
As for an update, I got glue all over that circuit board, and it still works. So hoo-ray! But I recommend caution.
There are varying sizes of USB drives you can get. I wanted something small, but something cheap. Anyway, even though this was the cheapest, it was still too long to completely fit inside. When trying to figure out how to glue the torso to the legs, I had to position it so that he was leaning forward a little bit, because I really want him to be able to stand up. I was successful with that, but the gap in front was very visible. No worries, I grabbed the utility belt from the fire fighter and painted it white. I was able to use that to successfully cover the big open stomach. I also glued that into place to keep from losing it.
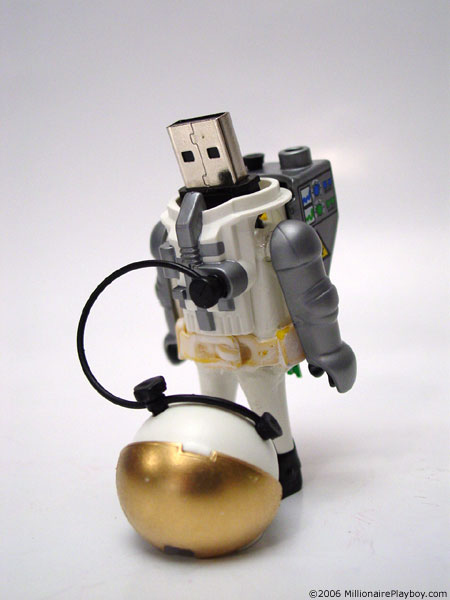
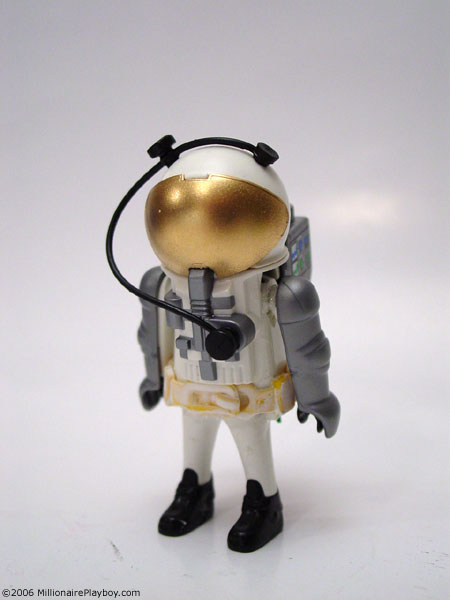
I spray painted the face shield gold to look more like an astronaut dome, but I don’t like how it’s not super reflective (I was hoping for the look from the Halo action figures). I was able to reattach all of the accessories, and it’s completely done. There is a little tiny part of the board that sticks out in back, and that’s where the tiny LED is, so when he’s plugged in, his ass glows. There you have it.
Attempt 2
 I
I
then went on another shopping trip to find better thumb drives and more astronauts… when all of a sudden I found the one true sign that God wants me to quit my job, massacre playmobil men and turn them into functioning USB drives. The Sony
Micro Vault USB drive was on sale at Target! Have you seen this thing? It’s so tiny, yet it fits into any standard USB port! It’s so small in fact, that I could leave it’s own protective casing on, without worrying about getting glue on the conductors, AND the playmobil man could keep his moving arms and legs! This drive was built specially for me much like that deodorant is for girls. As you can imagine, I was feeling happy and fresh. All you do here is pop out the internal skeleton as above, but remove a chunk from his back so that you can replace the skeletal structure to hold in his arms and legs. I did remove the part of the skeleton that held his neck in place. I basically eye-balled this thing, and the used liberal amounts of glue. After it was securely glued in, I added the arms and legs back. Then his chestpiece and backpack (which covered his gaping hole nicely). This new drive has done really well. I tested it out at a conference last week
and he was transporting files intergalactically withease. The only issue was that the desktop system
I was using had their USB ports sunken into the case too far for the spaceman’s backpack to fit. So I used a USB hub or short 3″ long USB extender. It has nothing to do with the drive, it’s the way the computer was built.
 There you go, all you need is a drill and some heavy duty glue. If you customize a USB drive, send me an e-mail, I’ll post reader submissions here. If you like making stuff, check out our easy to follow directions for building a Scale model craps table, or our real working Batphone (complete with cake cover).
If you dig playmobil, be sure to check out my exhaustive playmobil coverage over at MPb, including the 3 foot wide Roman Colosseum complete with chariots, gladiators and lions. Sweet.
|
|
Posted in crafts, DIY, gadgets, how to, playmobil | 1 Comment »


July 2nd, 2010 at 10:40 pm
[…] Weekend 144 Posted on July 3, 2010 by Winston (1) Make your own Playmobil flash drive […]